We have loved the Sampler Shuffle Block series, and was sad to see it end. We've loved seeing the blocks you created!
As our gift to you, we wanted to provide you with the whole set of patterns after all! So if you missed a few here and there, or just didn't get any of them now you can get the whole set right here!!
Click each photo to enlarge it (you can save these to your computer by right clicking and then clicking "Save image as". Or if you want an easily printable format click the "Pattern # PDF" link below each image to take you to the pattern download page.
It's been a long time since we offered new tutorials or patterns here on the blog, but that is all about to change! We have a fun new series for you that starts up this Saturday and runs until the 4th of January to get you fired up, get your pattern collection expanded, and to learn some new techniques.
Who can participate?
Anyone! There is no subscription or purchase necessary.
What is this?
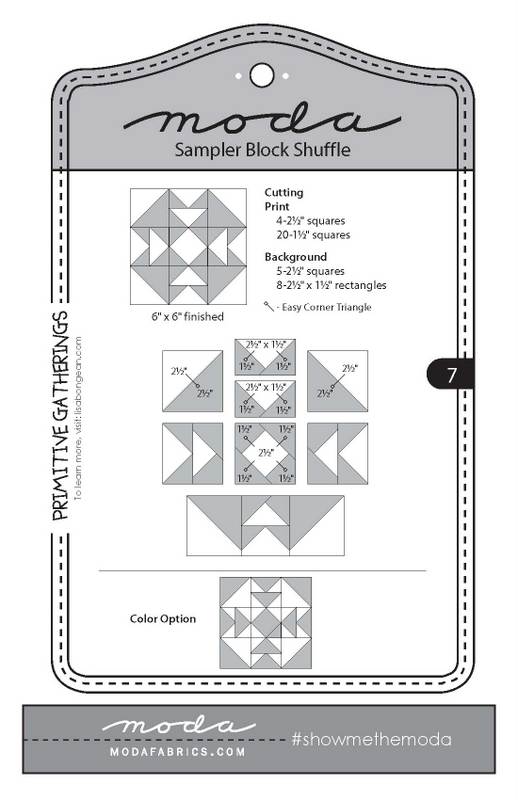
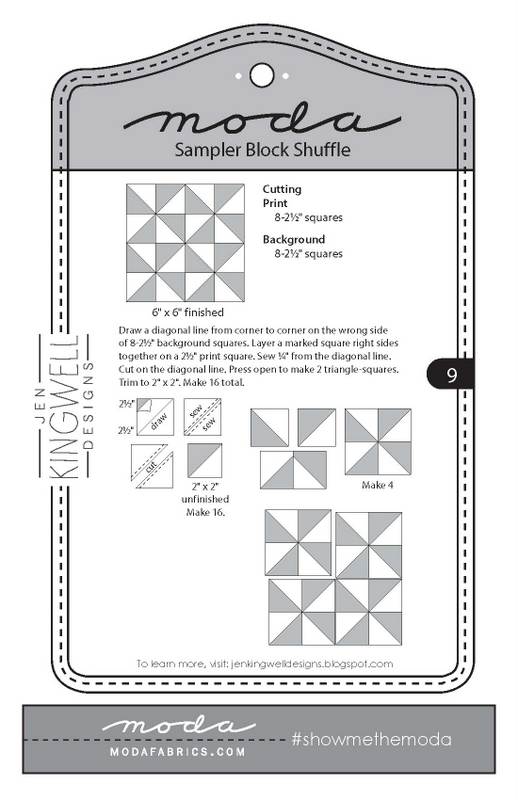
This series is the Sampler Block Shuffle, created by Moda Fabrics.
Each pattern creates a 6"x6" pieced square. This may seem small to some, but they are designed to teach piecing skills and to learn new techniques!
Where?
The Patterns will be posted up here on the blog. Near the top of the right hand menu bar you can see the "Sampler Block Shuffle" button. This will bring up the Sampler Block Shuffle Page with links to all patterns.
We will post up reminders on our Facebook page, but patterns will not be posted on Facebook. Those are only available here on the blog!
When?
Each week we will post up 2-3 new patterns. Saturdays at 7am MST the new patterns will go live!
The first pattern will go live on Saturday, October 31st.
New patterns will be available weekly through January 4th, 2016.
Patterns will only be available for 2 weeks! You'll need to be sure to visit the blog every week to be able to collect the entire set of patterns.
We do recognize that this is a busy time of year. Some of you may want to participate, but not have the time during the holidays to make the blocks. Come visit the blog each week to collect the patterns, and save them for later when you can actually make the blocks!
Why?
Why not?!
Because this is going to be incredibly fun! We can't wait to see everyone's colors and creations.
How?
Fabric Requirements
For the sampler squares it is suggested to use either 2 Jelly Rolls, 2 Layer Cakes, or one of each. Having lights and darks will make this quilt more dynamic!
Additional fabric will be needed to set the blocks if desired. Moda has provided a great setting pattern to create an entire quilt. The fabric yardages and instructions for the setting pattern can be found by clicking here.
As you follow along, be sure to share photos of your finished sampler blocks with us! You can post them to the Facebook Page, email them in, or even post them on Instagram!
If posting on Facebook or Instagram don't forget to include #modasamplershuffle and #auntjudysattic in your caption so the photos are linked to the event!
So be sure to come back this Saturday to get the first 2 patterns in this fun new series!!
I'm going to deviate from the norm today and branch away from quilting. Today I have a tutorial for you on how to make easy decorative envelopes from scrapbook paper!
We no longer carry scrapbook paper in the store, but we know many of you still keep paper on hand. I was in charge of making invitations to a church event and found myself at home with no envelopes, and no car to run get envelopes. So I had to get creative.
The invitations were quarter sheet sized (4.25" x 5.5"), so the envelope needed to be sized accordingly. I quickly found though that I didn't have any glue (apparently that got chucked out in the move!). However I did have one roll of washi tape. But, it worked out wonderfully and kept the supply list simple.
Here's what you'll need:
1 12"x12" sheet of scrapbook paper for every 2 invitations
1 pair scissors
1 roll washi tape (or decorative seals/stickers)
Following I have step by step instructions with pictures. If watching a video works better for you, there's one at the very bottom of the post.
Start by folding the scrapbook paper in half from corner to corner to give you a good crease to cut on. If you prefer, you could draw a line with a straight edge from corner to corner...whatever suits you tickles me plum to death (name that movie quote!).
Cut the paper on the crease to give you two large triangles.
Place your invitation in the center of the triangle, giving you at least an inch on the bottom and some room above each top corner (see below).
Fold the bottom edge of the paper up over the invitation (don't fold the invitation, just the scrapbook paper).
Next, to make it easier, I turned the paper to the side. From there fold up the right side of the scrapbook paper, aligning the edges of your previous crease.
Fold the little triangle tail in to keep it tidy.
Next, fold over the left side of the scrapbook paper, just as you did with the right side.
Again, tidy up the corner by folding over the point.
This is the trickiest part to explain, but it's not hard to do. Here you want to tuck the two side flaps into each other using the bottom crease/pocket you made in the first fold. Clear as mud? If not, watch the video and you can see what I mean. This step keeps the sides held together without having to glue them.
See...all tucked in, nice and snug.
Fold the top down to form your flap, and your envelope is done! At this point I used a piece of washi tape to hold down the back flap.
The bottom is open technically, but with the first fold you made (folding the bottom of the paper up over the invitation), and by how snug all the folds are around the invitation, the invite is not going to fall out unless seriously tampered with. If you want to mail this, you will probably want to seal the bottom by running a small bead of glue between the two layers. Since we were hand delivering these, we just stuck with the washi tape and called it good.
There you have it! If you're not sure exactly what I meant in any of the steps above, you can watch the video below and hopefully that will help clear things up.
This past Friday a few of the girls (Jillyn, Sandra, and Maria to name a few) got together here at the store to make these fantastic walker bags for the residents of the Ft. Bayard Medical Center. These sure help to add cheer to the facility, make carrying things around much easier for the residents with walkers, and provided a great way for these ladies to connect with the community. This was a great service project and we were tickled to be a part of it. For a PDF of the instructions to make these walker bags, click here.
We have "girl colors" and "boy colors" in the Strip-It Fabric here in the store.
½ yard for ribbon pieces
1 Fat Quarter for embellishment
Backing
Batting
Binding
All
seams are ¼ inch seam allowance.
Instructions:
1. Cut Strip-It Fabric according to cutting
diagram (1) below.
2. Cut ribbon pieces according to piecing
diagram (2) below. Seam together. The
(54.5 inches) will be seamed together with the seam going under the
embellishment.
3. Sew all sections together refer to piecing
diagram (2).
4. Cut out desired embellishment
5. Trace outline of embellishment on your
preferred double sided fusible material.
6. Cut out embellishment
7. Fuse embellishment to quilt top.
8. Decorative stitching around embellishment.
9. Layer top, with batting and binding and quilt
in desired fashion.
10. Bind in desired fashion. I like to use 2.5 inch double fold binding.